

Drywall finishing has an official 5-level scale that determines surface quality, finish smoothness, and final appearance before painting or decoration.
The five drywall levels range from Level 0 (no finish) to Level 5 (premium smooth finish for high-gloss paint or strong lighting conditions).

In my career, I’ve seen how misunderstanding these levels gets people into trouble. Each level matches a specific purpose. Level 0 is just installation without any joint treatment. Level 1 covers joints with tape and compound for structural hold in temporary or hidden areas. Level 2 adds enough compound for tile backing or low-finish zones. Level 3 involves two coats of compound and sanding for textured or patterned walls. Level 4 is the standard for most homes and light commercial spaces. Level 5 requires the highest craftsmanship, applying a skim coat over everything for perfect surfaces under high light or glossy coatings.
| Level | Description |
|---|---|
| 0 | Boards installed, no finishing. |
| 1 | Joints taped and coated lightly. For hidden or temporary areas. |
| 2 | Joints coated more fully. For tile backing walls. |
| 3 | Two coats and sanding for textured finish walls. |
| 4 | Full finish for standard paint or light wallpaper. |
| 5 | Skim coat over all surfaces for premium smooth finish. |
What is level 4 drywall finish?
Level 4 is the most common finish in residential projects and balances cost with quality.
Level 4 includes full joint taping, corner reinforcement, screw/nail hole filling, sanding, and a thin final coat, suitable for most paint and light wallpaper.

From my professional work, I recommend Level 4 for bedrooms, hallways, and most living areas. It gives a smooth base for latex or matte paint. The process includes taping all joints, applying at least two coats of compound, sanding until smooth, adding a finishing layer, and ensuring corners and fastener holes are completely covered. It is not ideal for glossy paints or areas with strong lighting that could highlight imperfections.
| Step | Detail |
|---|---|
| Tape All Joints | Paper or mesh tape applied |
| First Compound Coat | Covers tape and fills gaps |
| Second Compound Coat | Wider coverage to blend into wall surface |
| Sanding | Smooth surface throughout |
| Final Thin Coat | Even finish before painting |
What are the stages of drywall?
Drywall installation has four main stages from preparation through final finish.
The stages are preparation, installation, joint treatment, and finishing—each critical to wall quality.

Over the years, I have learned that skipping steps means poor results. In the preparation stage, measure, choose materials, and ready the framing. Installation follows, cutting boards and fixing them to the frame. Joint treatment comes next, using tape and compound in layers to seal seams. The finishing stage includes sanding and applying texture or primer. Each stage must be completed in the right order and with precision to avoid visible defects later.
| Stage | Task |
|---|---|
| Preparation | Measure space, select materials, prepare frame |
| Installation | Cut drywall panels, attach securely to studs |
| Joint Treatment | Apply tape and compound in layers to joints and corners |
| Finishing | Sand, texture, and prime surface for paint or wallpaper |
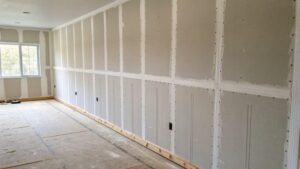
In what order do you install drywall?
Drywall panels need to be installed in a specific sequence to ensure structural support and minimize visible seams.
Install the ceiling first, then upper wall panels, then lower wall panels, and finally special cut pieces around openings.

I always start by installing ceiling panels before walls. This allows wall panels to support ceiling panel edges. Upper wall panels come next, starting from one end of the room and staggering seams. Lower panels follow, creating "T" seams rather than cross-shaped seams for better strength. Special panels around doors and windows come last. This sequence improves alignment, stability, and appearance, and prevents cracks at panel edges.
| Installation Step | Reason |
|---|---|
| Ceiling Panels | Supports edges of wall panels, hides ceiling joints |
| Upper Wall Panels | Allows better seam staggering |
| Lower Wall Panels | Avoids full cross seams, increases wall stability |
| Around Openings | Precise cutting for windows, doors, and unique shapes |
Conclusion
Drywall finishing levels and correct installation order directly affect wall quality. For most homes, Level 4 is the perfect balance, with Level 5 reserved for high-detail areas.
TRUSUS – *Bring beauty to every corner of the world**
🌐 www.gypsum-board.com